
The thin plastic layer on a stainless sheet is not packing waste to rip off at the door, and it is not a permanent finish to leave on at all costs. On sheet metal, protective film is a temporary surface shield with a defined job—and a defined moment when it must come off. Handle that timing wrong and the film becomes a defect source: melt residue in the kerf, cracked film at the bend, or coating that will not stick.
What Protective Film Means on Sheet Metal
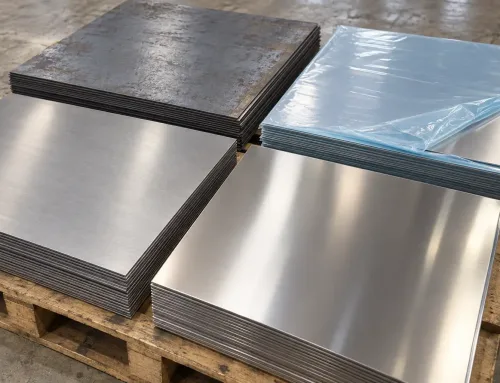
Protective film is a temporary, self-adhesive plastic layer applied to sheet, plate, or pre-finished coil to limit cosmetic and handling damage until the part is processed or delivered. It is usually a thin PE (polyethylene) or similar film with a pressure-sensitive adhesive tuned for metal surfaces—strong enough to stay put through handling, weak enough to peel cleanly when the process allows.
In fabrication, the film is process protection, not the product. Buyers are not purchasing a laminated metal panel; they are specifying how the raw surface should be guarded while cuts, bends, welds, and finishes are added.
Not the Same as Packaging Film
Packaging film wraps a shipment. Stretch wrap, bubble wrap, and corner protectors shield a crate or a stack in transit. Protective film is bonded to the metal face itself, travels with each sheet or cut blank, and is chosen for surface type and process (for example laser-grade film for cutting). Do not expand a sheet-metal film note into a packaging spec—and do not assume warehouse wrap will protect a brushed finish through the brake.
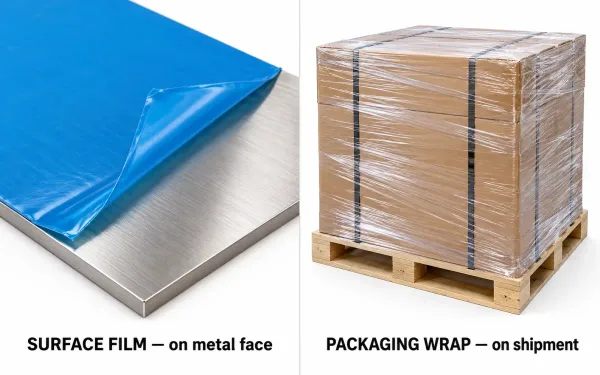
Left: protective film bonded to a metal sheet face. Right: stretch wrap around a shipping crate. Labels show which is process protection and which is packaging.
What the Film Protects—and On Which Surfaces
Film exists to keep as-delivered surfaces usable. Typical jobs include:
- Scratches and scuffs from forks, slings, stacking, and shop handling
- Fingerprints and smudges on bright or brushed stainless
- Light contamination (dust, overspray risk, incidental marks) during storage and assembly
- Process marks on visible faces while nearby features are cut, formed, or welded
Typical Surfaces and Finishes
Film is most valuable on surfaces that will be seen or that are expensive to refinish:
| Surface / finish | Why film is commonly used | Process caution |
|---|---|---|
| Brushed or polished stainless | Scratches show immediately on bright grain | Confirm film is suitable for the finish; aggressive adhesive can leave residue on some polishes |
| Aluminum sheet | Soft face dents and scuffs easily | Remove before anodize or if tape/film interferes with etching |
| Coated or pre-painted coil | Coating scratches cannot be touched up easily | Peeling too early exposes the coating through subsequent handling |
| Cosmetic steel panels | Visible faces after assembly | Keep on through cutting and forming when the film is process-safe |
Match the film to the surface condition and the later process, not only to “metal” in general. A film that is fine on mill-finish carbon steel may be wrong on a mirror panel.
Where Film Sits in the Fabrication Chain
Film is usually applied at the mill, service center, or processor, then travels with the stock into the fabricator. It can stay through receiving, laser or punch cutting, and forming—until a step needs bare metal (welding prep, coating prep, some hardware installs) or until final clean before ship. The decision is per operation, not one global “leave on” or “peel first” rule.
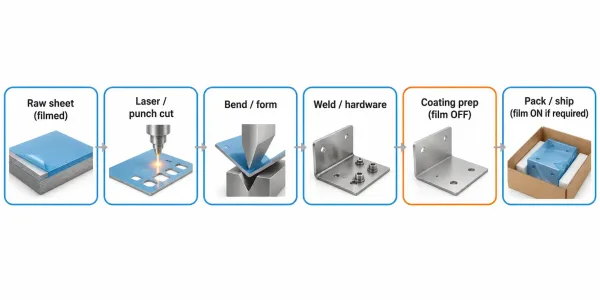
Fabrication steps from raw sheet to ship. Film usually stays through cutting and forming; it is removed before coating prep and may return before packing.
Laser Cutting: Keep the Film On, Peel It Off, or Watch for Trade-offs
Laser cutting is the step where film policy is most visible. Many shops cut stainless and aluminum with laser-grade film left on so the visible face stays clean during loading and cut. That works when the film is specified for the process and the cut is standard.
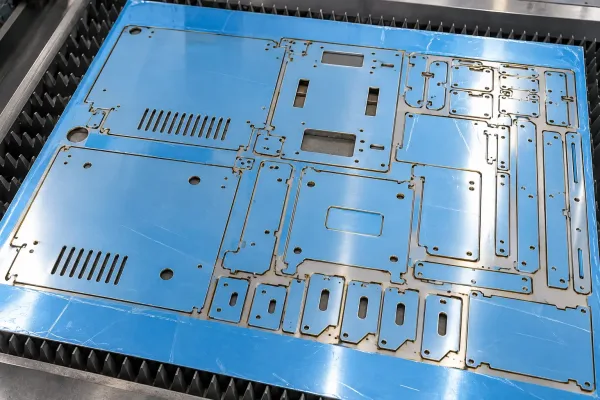
Nested laser-cut blanks remain on blue protective film after cutting so the cosmetic face stays clean during handling.
When Leaving Film On Works
- Exterior or brushed faces that must stay scratch-free through the shop
- Nested sheets where blanks are handled and stacked after cutting
- Film labeled for laser cutting (typically PE-based films rated for the process)
Cutting with the film on reduces handling marks without a second peel-and-protect cycle. The trade-off is process control: smoke, spatter, and heat still interact with the film at the kerf.
When Film Gets in the Way
Peel first—or switch film type—when you see:
- Melt or residue at the edge — non-laser film can char and bond near the cut, leaving cleanup work or coating rejects
- Heavy piercing or thick plate with more heat input, which can cook adhesive into the kerf
- Post-cut welds or adhesives on the cut edge or face where residue is unacceptable
- Very tight cosmetic criteria where any heat-affected film discoloration on a show face is a fail
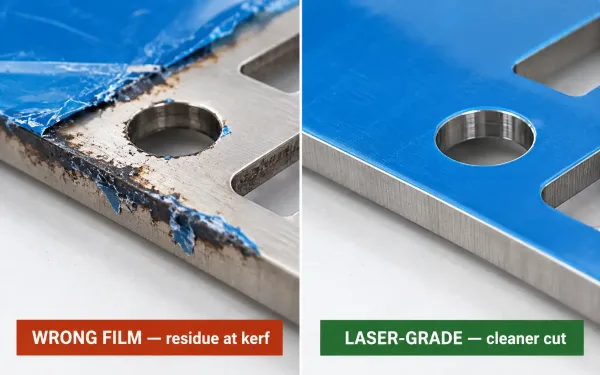
Left: non-suitable film leaves melt residue near the kerf. Right: laser-grade film cut stays cleaner on the face and edge.
Mechanism in short: the laser vaporizes metal; the film is organic. If the film is not meant for that heat, adhesive and plastic degrade at the cut and can smear onto the edge or face. Mitigation is simple—use laser-rated film, reduce unnecessary heat input, or remove film from the cut zone when the drawing demands bare, clean edges.
Bending and Forming: Film Behavior Under Strain
Bending stretches the outer fiber and compresses the inner fiber of the sheet. Film on those faces is along for the strain. Thin film often elongates with the bend; brittle or thick film can split, wrinkle, or lift at the inside radius.
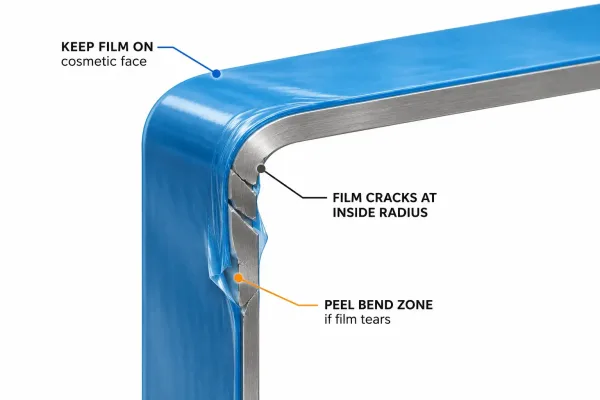
Bend cross-section. Film on the outside stretches; film at the inside radius may crack or lift. Short labels mark keep-film and peel-bend-zone options.
Before the Brake
- Keep film on for cosmetic faces that would touch the pad or backgauge tools, if the film is formable and the inside radius is not extreme.
- Remove film along the bend line when the film cracks at the radius, when adhesive oozes at the flange, or when the bend is tight relative to thickness and film type.
A practical check: if the film tears on the prototype bend, it will tear in production. Either change the film, or peel the bend zone and protect the face another way.
After Forming
Inspect the film at:
- Inside radii — splits that expose bare metal mid-process
- Sheared or laser edges — lifted film that traps chips and grit
- Hardware and weld zones — film that will be in the way of studs, PEM inserts, or weld prep
Formed parts with film still intact should be kept clean under the film; grit trapped under film can polish or scratch the face when the part is stacked. Mitigation is timing: peel, clean, and re-protect only when the next process needs bare metal—then protect again before packing if the customer requires film-on delivery.
Before Painting or Coating: Why Film Usually Must Come Off
Powder coating and liquid paint need a clean, continuous substrate. Protective film—and especially its adhesive—is a contaminant. Film left on through the pretreat or spray line causes adhesion failure, fisheyes, and craters; film removed late leaves adhesive that solvent wipe alone may not fully clear.
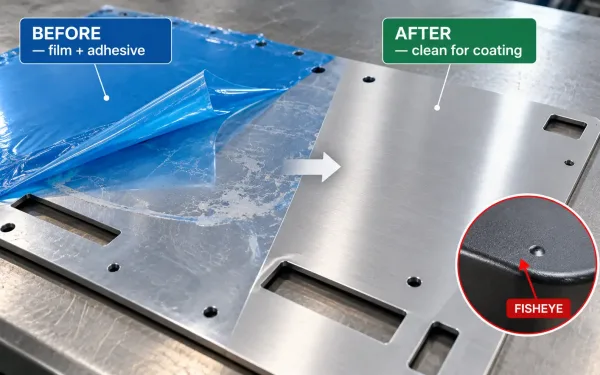
Before coating: film and adhesive are removed, then the surface is cleaned so powder or liquid paint can bond. Adhesive left behind causes fisheyes and poor adhesion.
Powder and Liquid Coating Sensitivity
- Powder systems cure at elevated temperature; remaining adhesive can outgas and pinhole the film.
- Liquid coats are sensitive to silicone and many adhesive residues; a “looks clean” panel can still fish-eye after flash-off.
- Pre-painted stock is different: the coating is already on the metal, so film often stays until after forming and assembly, then peels before final clean—not before a bake that is not scheduled.
Rule of thumb: if the next step is a wet or powder finish on bare metal, remove film and adhesive before pretreat. If the next step is forming or assembly on an already finished surface, film can usually stay.
Clean-Down Before Finish
After peel-off:
- Remove adhesive residue with a cleaner compatible with the substrate (avoid leaving films of solvent or oil).
- Verify the face under angled light—residue that is invisible head-on can still ruin a low-gloss coating.
- Handle with clean gloves until the part enters pretreat so fingerprints do not become the new contaminant.
Skipping clean-down is a common cause of “mystery” coating defects that appear only on film-protected lots.
How to Call Out Film Status on Drawings and RFQs
Fabricators will not guess your cosmetic and coating intent. Unwritten film assumptions become rework: someone peels a show face too early, or someone sprays over adhesive.
What to Specify
Write film status by zone and process, not as a single global note. Useful callouts include:
- Cosmetic faces — “PE protective film to remain until packing” or “remove before assembly”
- Coating prep — “Remove film and adhesive before pretreat; surface free of residue”
- Bend or weld zones — “Film may be removed at weld prep and bend lines as needed for process”
- Delivery state — film-on at ship, or bare and lightly protected with non-marring packaging only
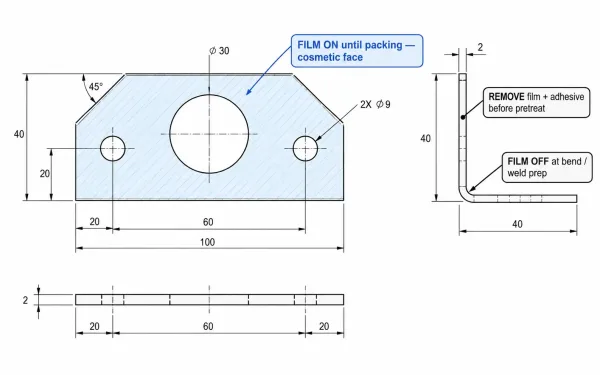
Drawing note example: film remains on cosmetic faces until packing; remove film and adhesive before pretreat; film may be removed at bend and weld prep.
What Fabricators Need to Confirm
At RFQ or kickoff, confirm:
- Whether laser-grade film is acceptable on cut parts
- Who owns peel and clean before coating (shop or customer)
- Residue acceptance—any visible adhesive after peel is a defect, or only residues that affect coating/assembly
- Whether one film color/brand is required for traceability or appearance on a fleet of panels
A short note in the RFQ or drawing is cheaper than sorting scrap after the first bake.
Key Takeaways
- Protective film on sheet metal is temporary process protection—not packaging wrap and not a permanent finish.
- Laser cutting can run with laser-grade film on for cosmetic faces; wrong film type creates kerf residue and cleanup.
- Bending can split or lift film at tight radii; peel the bend zone when the film cannot elongate with the metal.
- Paint and powder almost always require film and adhesive removal before pretreat—heat and wet coats will show every shortcut.
- Specify film status on drawings and RFQs by face and process so peel timing is a requirement, not a debate.
Treat film like any other process consumable: match it to the surface, the operation, and the handoff. When you are unsure whether a face should stay filmed through cutting or come clean before coating, raise it at quotation. A fabricator that reviews drawings for film, residue, and cosmetic zones before price locks can keep the schedule—and the surface—where you need them.