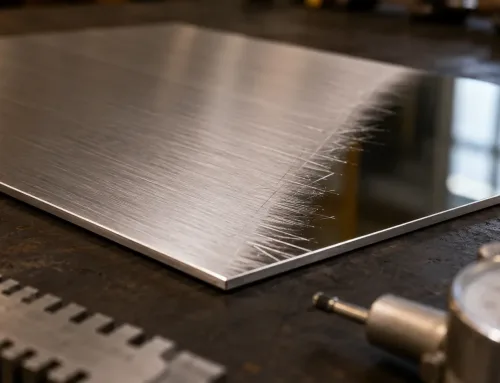

A brushed finish is a surface treatment where abrasive materials create parallel, directional lines on metal. Unlike a polished mirror surface, brushed metal has a muted, satin-like appearance that hides minor scratches and fingerprints. Engineers and designers choose this finish when they want a consistent texture with controlled reflectivity—often for aesthetic panels, enclosures, or consumer-facing components.
This glossary entry explains what a brushed finish really means for metal parts: how texture direction and consistency are controlled, which materials respond best, and how to specify it correctly on engineering drawings so manufacturers deliver exactly what you expect.
What Is a Brushed Finish?
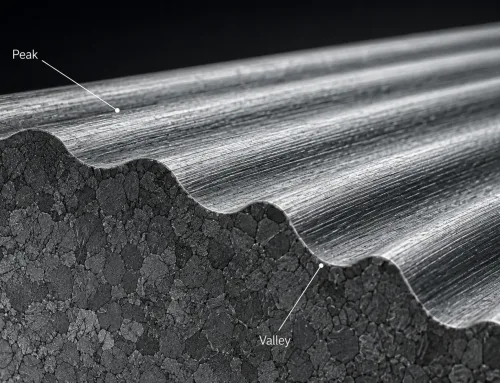
A brushed finish is a mechanical surface treatment that creates a pattern of fine, parallel lines on metal using abrasive materials such as sandpaper, abrasive belts, or wire brushes. The process removes a thin layer of material, leaving a directional texture that reduces reflectivity and creates a uniform, matte appearance.
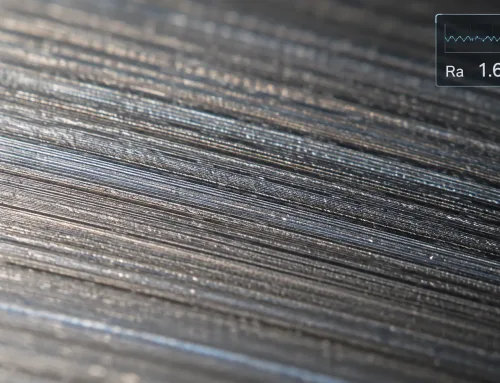
Unlike random-texture finishes like bead blasting, brushed finishes have a clear grain direction. This directional quality is both functional—it helps hide minor scratches along the grain—and aesthetic, giving parts a clean, professional look common in electronics housings, appliance panels, and architectural trim.
Brushed vs. Polished: Key Differences
The table below summarizes the primary differences between brushed and polished finishes:
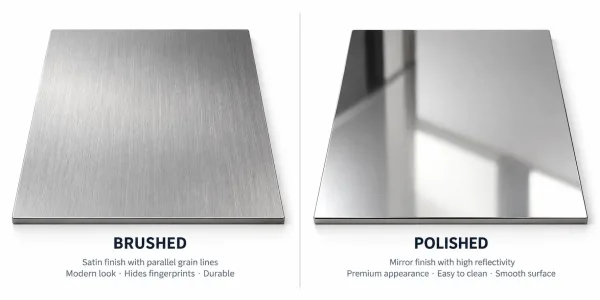
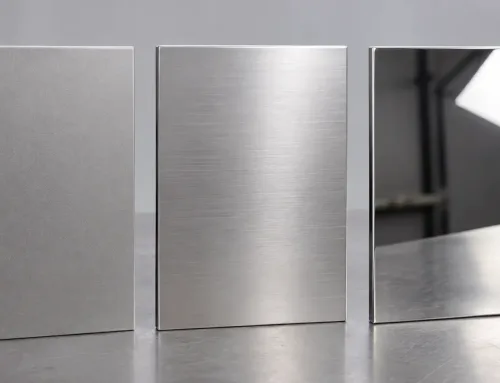
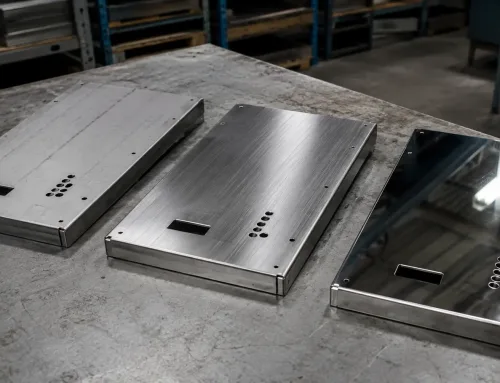
Side-by-side comparison showing brushed finish on left with visible grain lines and polished finish on right with mirror-like reflection.
| Characteristic | Brushed Finish | Polished Finish |
|---|---|---|
| Surface Texture | Directional, parallel lines | Smooth, mirror-like |
| Reflectivity | Low to medium (satin appearance) | High (mirror-like reflection) |
| Scratch Visibility | Scratches blend with grain direction | Scratches highly visible |
| Typical Ra Value | 0.4–1.6 µm (16–63 µin) | 0.05–0.2 µm (2–8 µin) |
| Common Applications | Enclosures, panels, appliance surfaces | Decorative trim, reflectors, medical devices |
| Maintenance | Easier to touch up | Requires careful handling |
The choice between brushed and polished depends on function and environment. Brushed finishes work better where durability and low maintenance matter; polished finishes suit applications requiring high reflectivity or easy cleaning.
Texture Direction and Consistency Control
A brushed finish’s appearance depends on two variables: texture direction and consistency. Getting these right requires understanding how the abrasive process works and what parameters to control.
How Texture Direction Is Achieved
Texture direction follows the path of the abrasive material. In manual brushing, the operator moves the abrasive in straight, parallel strokes. In machine brushing, the part passes under rotating abrasive belts or brushes in a fixed direction.
Common texture directions include:
- Longitudinal: Parallel to the part’s longest dimension (most common)
- Transverse: Perpendicular to the longest dimension
- Circular: For cylindrical parts like tubes or round covers
Texture direction must be specified on drawings when it matters for assembly, function, or appearance. For example, panels that slide into frames should have grain direction parallel to the slide path to minimize visible scratches during installation.
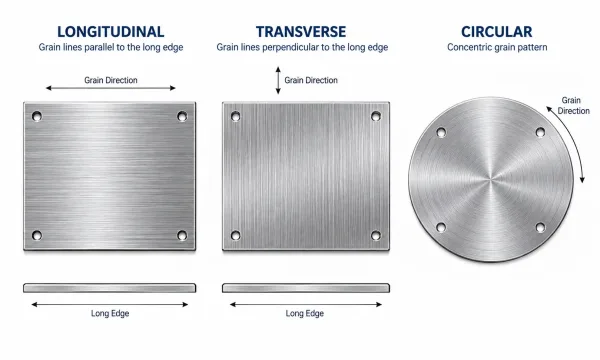
Technical diagram showing three texture direction options: longitudinal (parallel to long edge), transverse (perpendicular to long edge), and circular (for cylindrical parts).
Grit Levels and Ra Values
Surface roughness after brushing depends on abrasive grit size. The following table shows typical relationships:
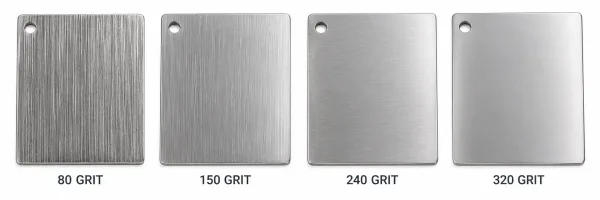
Four metal samples showing progressive grit levels from coarse (80 grit) to very fine (320 grit) with corresponding surface texture differences.
| Abrasive Grit | Typical Ra (µm) | Typical Ra (µin) | Appearance |
|---|---|---|---|
| 80–100 | 1.6–3.2 | 63–125 | Coarse, visible grain |
| 120–150 | 0.8–1.6 | 32–63 | Medium grain, common for enclosures |
| 180–240 | 0.4–0.8 | 16–32 | Fine grain, satin appearance |
| 320+ | 0.2–0.4 | 8–16 | Very fine, near-polished |
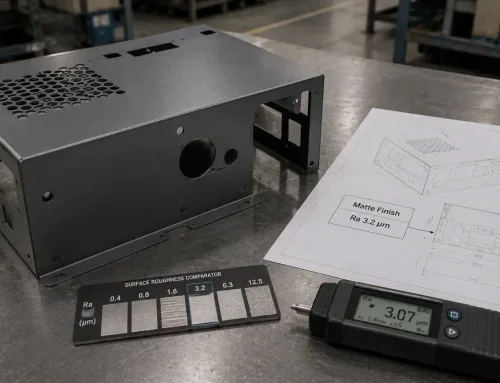
When specifying brushed finish on drawings, include either the grit number or the Ra range—not both, unless you need precise control. Grit numbers are easier for suppliers to interpret; Ra values provide measurable acceptance criteria.
Which Metals Can Be Brushed?
Most metals can be brushed, but results vary significantly by material. The following sections describe what to expect from common sheet metals.
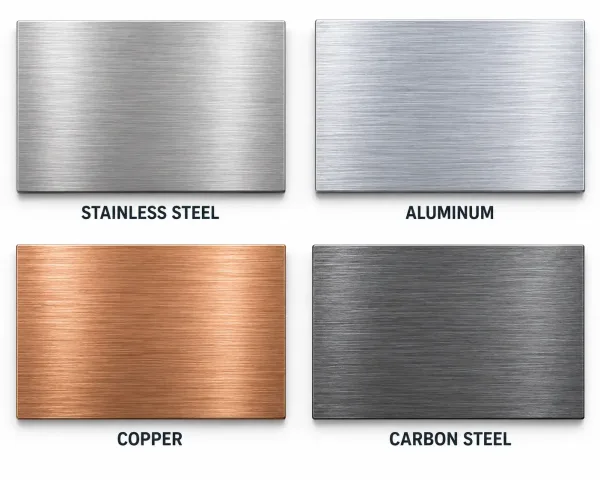
Four brushed metal samples showing texture differences on stainless steel, aluminum, copper, and carbon steel.
Stainless Steel
Stainless steel (304, 316, and other austenitic grades) is the most common material for brushed finishes. It produces a clean, uniform grain and is relatively forgiving of process variations. Brushed stainless steel is standard for appliance panels, elevator interiors, and food-service equipment.
One consideration: brushing removes the passive oxide layer that gives stainless steel its corrosion resistance. After brushing, parts may need passivation treatment, especially in corrosive environments.
Aluminum
Aluminum alloys (5052, 6061, etc.) can be brushed, but the softer material creates deeper, more visible grain lines. The texture tends to be more pronounced than on stainless steel at the same grit level.
Anodizing after brushing is common for aluminum parts. The anodized layer preserves the brushed texture while adding hardness and corrosion resistance. However, the anodizing process can slightly alter the texture appearance, so samples should be approved before production.
Copper and Brass
Copper and brass develop a natural patina over time, which affects brushed texture appearance. Freshly brushed copper has a bright, warm tone that darkens with handling and exposure.
Brushing copper and brass requires careful handling to avoid fingerprints and oxidation before coating. Clear lacquer or anti-tarnish coatings are often applied immediately after brushing to preserve the appearance.
Carbon Steel
Carbon steel can be brushed, but it rusts quickly without protection. Brushed carbon steel parts must be coated (paint, powder coat, or plating) shortly after finishing to prevent oxidation.
The grain texture on carbon steel is similar to stainless steel, but the base material’s lower corrosion resistance makes post-brush protection essential.
How to Specify Brushed Finish on Engineering Drawings
A clear drawing callout prevents ambiguity and ensures suppliers deliver the expected surface. The following elements should be included when specifying brushed finish.
Essential Callout Elements
A complete brushed finish callout includes:
- Finish type: “Brushed finish” or “Brushed texture”
- Texture direction: “Grain parallel to [dimension]” or “Longitudinal grain”
- Surface roughness: Ra range (e.g., “Ra 0.8–1.6 µm”) or grit equivalent (e.g., “180 grit”)
- Appearance notes: “Uniform texture, no visible scratches perpendicular to grain”
- Post-treatment: If required, specify passivation, anodizing, or coating
Example callout:
BRUSHED FINISH, GRAIN PARALLEL TO LONG EDGE
Ra 0.8–1.6 µm, UNIFORM TEXTURE
PASSIVATE PER ASTM A967 AFTER BRUSHING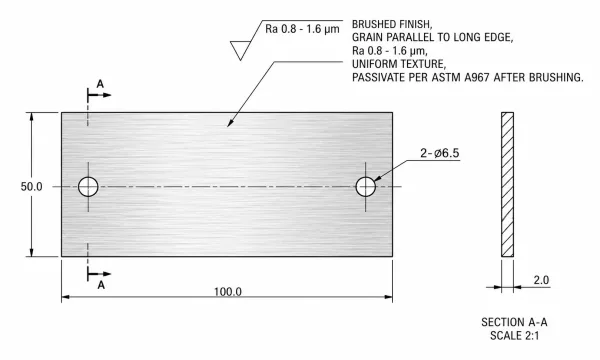
Engineering drawing detail showing a brushed finish callout with texture direction, Ra value, and post-treatment requirements.
Common Annotation Mistakes
Drawing callouts that cause problems:
- “Brushed finish” alone: Without direction or roughness specification, suppliers choose defaults that may not match your intent
- Conflicting specifications: Calling for both “brushed” and “mirror finish” creates confusion
- Unrealistic Ra values: Specifying Ra 0.2 µm for brushed finish may push into polished territory
- Missing post-treatment: For stainless steel in corrosive environments, omitting passivation invites corrosion issues
When in doubt, include a surface texture sample or reference standard in your drawing package.
Impact on Dimensions and Tolerances
Brushed finish removes material, which affects final dimensions. Engineers must account for this in tolerance stacks, especially on tight-tolerance parts.
Material Removal
Brushing typically removes 0.005–0.025 mm (0.0002–0.001 in) of material, depending on grit and pressure. This amount is small but can matter for:
- Parts with ±0.05 mm tolerances or tighter
- Assemblies where multiple brushed surfaces must align
- Thin sheet metal where removal affects stiffness
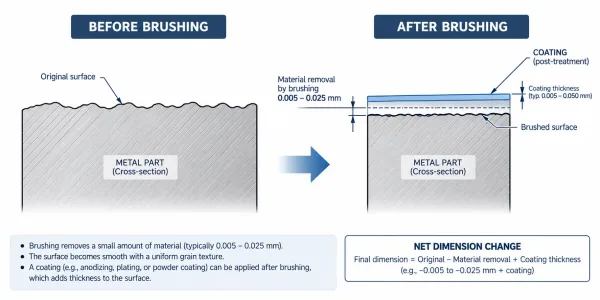
Cross-section diagram showing material removal during brushing and coating buildup after post-treatment.
For critical dimensions, specify whether measurements should be taken before or after brushing, or state clearly that dimensions apply to the finished (brushed) part.
Coating Thickness Considerations
If brushing is followed by anodizing, plating, or coating, the added layer thickness must be accounted for in dimension calculations. For example:
- Type II anodizing adds 0.005–0.025 mm per surface
- Powder coating adds 0.05–0.10 mm per surface
- Nickel plating adds 0.01–0.05 mm per surface
Brushing before coating means the final dimensions include both material removal and coating buildup. This two-step effect is often overlooked in tolerance analysis.
Ensuring Consistency in Production
Batch production of brushed parts requires process control to maintain uniform appearance across all parts. Key control points include:
Key Control Points
- Abrasive condition: Worn abrasives produce inconsistent grain. Replace abrasives on a defined schedule or after a set number of parts.
- Pressure and speed: Machine brushing parameters must be locked and monitored. Manual brushing relies on operator skill—document the technique.
- Part orientation: Parts must be presented to the abrasive in the same direction every time. Fixtures help maintain consistency.
- Incoming material: Surface condition of raw material affects brushing results. Specify maximum allowable surface defects on raw material.
Inspection Standards
Inspection criteria for brushed finish should include:
- Visual inspection: Compare against approved sample under controlled lighting
- Ra measurement: Use profilometer on representative parts per sampling plan
- Direction check: Verify grain direction matches drawing callout
- Defect limits: Define acceptable limits for scratches, pits, or uneven texture
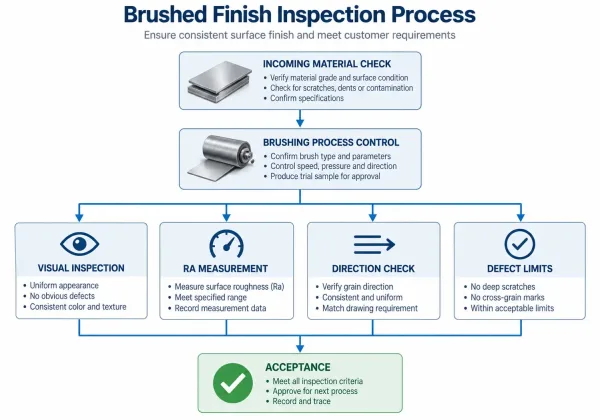
Flowchart showing key inspection steps for brushed finish quality control including visual check, Ra measurement, direction verification, and defect limits.
For critical applications, include a surface texture sample (physical or photographic) in your drawing package as the acceptance reference.
What to Check When Ordering Brushed Finish Parts
When requesting quotes or placing orders for brushed finish parts, verify these elements to avoid surprises.
Specification Checklist
Before sending your RFQ, confirm:
- Drawing callout includes texture direction
- Ra range or grit specification is stated
- Post-treatment requirements are specified
- Tolerances account for material removal
- Inspection criteria are defined
- Surface sample is provided if appearance is critical
Supplier Evaluation
When evaluating suppliers for brushed finish work, ask:
- What brushing equipment do you use (manual vs. machine)?
- How do you control texture consistency across batches?
- Can you provide surface roughness measurement reports?
- What is your standard sampling plan for appearance inspection?
Suppliers with dedicated brushing equipment and documented processes deliver more consistent results than those who subcontract the finish.